How to use SnapBridge with Multiple Cameras Simultaneously
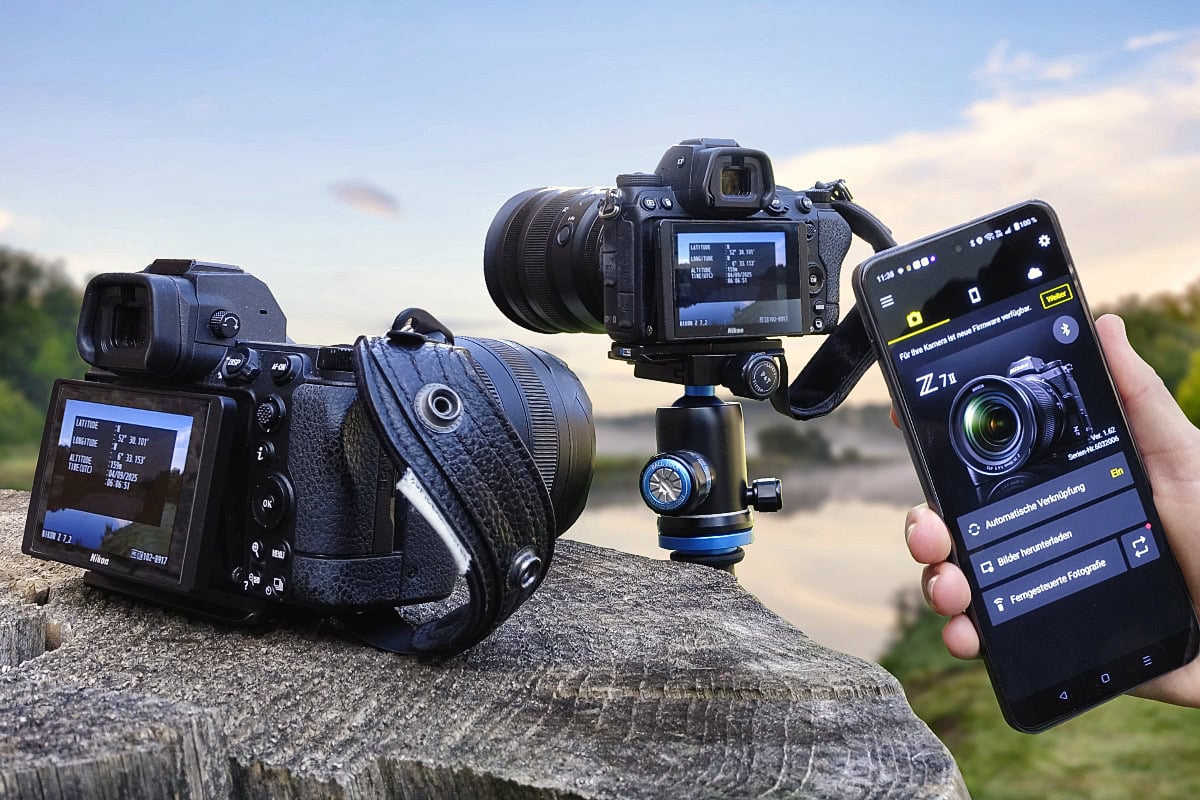
Transferring Location Data to Two Cameras Simultaneously with SnapBridge
Nikon’s SnapBridge app allows you to embed location data in your photos using the GPS of a connected smartphone, and it can do this with two cameras simultaneously. I have been using this feature for some time, even though it is not documented in Nikon’s official online manual.
According to nikonimglib.com, SnapBridge supports pairing with up to five cameras, though only one can be actively connected at any given time. This is broadly correct and applies, for example, to the app’s remote shutter function. If you want to use it with two cameras, you have to switch actively between them. Only then does the remote shutter become available.
Geotagging works in a similar way, though when you are out shooting you do not want to be constantly switching between connected cameras. My approach is as follows:
1. Start SnapBridge
2. Pair the first camera
3. Select ‘Switch camera’ in the settings and pair the second camera.
4. As long as SnapBridge is not closed, the app now delivers the current location data to all connected cameras simultaneously.
Why I Use SnapBridge for Geodata
I think very highly of my Nikon cameras, but when it comes to geotagging there is still room for improvement. At present only the top-of-the-range Z9 and D6 come with a built-in GPS sensor. With my own cameras, currently the Z7II and previously the D800E and D850, I have always had to rely on external GPS devices.
For many years I worked with the di-GPS M3-MTK Geotagger, until the absence of a 10-pin port on the Z7II made it unusable. As a replacement I chose the di-GPS Eco ProSummer M Geotagger. While it captured location data reliably enough, it caused problems in everyday use. During production days I had the small device permanently plugged into the side of the camera, and it often got stuck on the backpack when taking the camera in and out. Over time this damaged the accessory port on the camera. Following this experience, I switched to SnapBridge and now capture the geodata for my shots via my smartphone. Ideally, of course, Nikon would simply have equipped each camera with a GPS receiver from the outset.
Tips for Accurate Geodata with the SnapBridge App
The more accurately your smartphone captures your location, the more precise the geodata embedded in your photos will be. The following settings will help you get the best results.
Settings in the SnapBridge app
Activate ‘Location data’ in the camera tab of the SnapBridge app
Set the accuracy to “High” under ‘Location data’. This provides the best results, but increases the battery consumption of both the camera and smartphone. Therefore, test whether this setting is suitable for you. For example, in my practice, I need about two batteries per day per camera.
The ‘Power Saving’ mode under ‘Location Data’ can be enabled to pause location data transfer when the camera is not used for a while. This will reduce battery consumption, but should also be tested. In my experience, when re-enabling the mode, the location data from the previous location is transferred and it may take some time until the transfer is updated and the current location is transmitted.
Settings on Android devices:
Grant SnapBridge permission to use location access, if you haven’t already done so.
You can find this option under Settings > Apps. Tap on the SnapBridge app and then select ‘Allow all the time’ under Permissions > Location.
Select ‘High accuracy’ in the Settings under “Location”.
Enable “Wi-Fi and Bluetooth scanning” in the settings under ‘Location’, even if Wi-Fi or Bluetooth are currently not connected.
Settings on iPhone:
Grant SnapBridge permission to use location services, if you have not already done so.
This can be found under Settings > Privacy & Security > Location Services. Tap on the SnapBridge app and then select ‘Always’ or ‘While Using the App’.
Under ‘Privacy & Security’ in the settings, activate the option ‘Improve Location Accuracy’.
General tips:
Keep Wi-Fi enabled, even if there is no active connection, and ensure a stable internet connection.
Disable power saving mode, as this restricts background activities and location updates.
Related posts


Hi I’m Stefan
On my blog, I take you along on my travels, write about photo locations, and share insights into my work as a landscape photographer.
Join my Newsletter
Subscribe to my free, monthly newsletter and get exclusive discounts, travel stories and insights about photo locations, and be first to hear about new releases and more:
By clicking on ‘Subscribe’, you agree that we may process your personal data in accordance with our privacy policy.